

Bike commuting is having a moment. Since Covid, studies have shown that more people than ever are ditching their cars to get to work and elsewhere–the League of American Bicyclists puts the number at 14.5 million fewer single-passenger cars hitting streets every day. This is great news for physical fitness and for the environment, and it’s led to an increasing array of innovative products aiming to make traveling on two wheels as convenient as possible. An avid bike commuter myself, I’ve recently become a fan of Knog, a Melbourne-based bicycle accessory company that’s taken a handful of common bike accouterments back to the drawing board and come out with products that are sleek, modern, and tech-friendly. Two in particular have given me increased confidence in commuting this summer, one making me feel better locking my bike up nearly anywhere and another making it far safer to ride at night.
Knog’s Scout Alarm + Finder Nearly Eliminates the Worry of Bike T
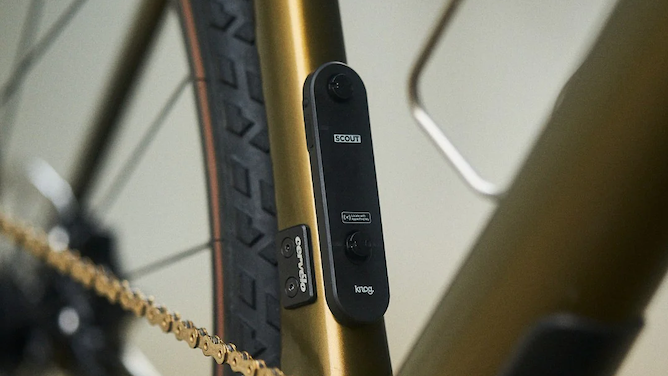
I’ve twice had a bike stolen while locked to a bike rack. For a cyclist who commutes by bike almost everywhere (admittedly, I now ride an e-bike), few experiences are more frustrating. No matter how a bike is locked, a thief with the right tools and enough time can get it free, but a new offering from Knog allows riders to track their bike via GPS anywhere it goes–even when disassembled. That tool is the Scout Bike Alarm + Finder, and it’s the most valuable addition to my bike commuting setup this year.
If you’ve ever used luggage trackers, the Scout works in a similar fashion, with all the perks of a car alarm to boot. It connects wirelessly to the Knog app and, once secured to your bike, relays its location to the app intermittently. It fastens to nearly any bike as long as there are screw sockets for a bottle cage, the common water bottle holder that accompanies riders all over the world. The Scout comes with two custom screws that can’t be unscrewed without Knog’s own screw tightener, so a thief can’t just take it off and ride away. As long as the Scout is attached to the bike frame, it’d be all but impossible to get away with anything other than the tires and handlebars without you being able to know where it ends up.
Specs:
-
Connectivity:
Bluetooth and Apple Find My (iOS only)
-
Alarm:
Motion-sensitive, 85 db alarm
-
Battery:
2-6 months
-
Mount:
Under water bottle cage
For added peace of mind, Knog includes two covert tactics to further fool enterprising thieves. The first is a thin neon yellow silicone cover. Strap this bad boy over the Scout before installing it and it looks like nothing more than a screw base added onto the frame. The second is truly genius – you can install the scout onto the bottle cage area and then install the bottle cage on top of the scout, making it nearly unnoticeable unless you know it’s there. This of course also means you can still carry your water bottle. On my Lectric XP3, the Scout screws in facing rearward on the frame underneath the seat, a very tough place for anyone to notice it.
The Scout charges via mini-USB and features an LED that shows battery status and notes whether or not the device is hooked to the app. I’ve yet to run the charge down after a few weeks of use, and the company notes it can last up to six months on a single charge. You will have to unscrew it to charge unless you have a portable charger that can connect a USB-C cable. As noted above, it’s designed to fit the bottle cage and measures 4.2 x 1.0 x 0.3 inches. My favorite thing about setting up the Scout is that it’s possible to arm it via the app or the device, so if I forget to connect it when locking up the bike I can do so remotely via the app.
Handily, it also connects to Apple’s “Find My” app, which is how to track the exact location of the device. I connected my Scout to “Find My” in about 30 seconds, and screwed it onto my bike in less than two minutes. All in all, setting this tool up took about five minutes after I’d let it charge for four hours out of the box.
The alarm sounds if the bike moves while armed – so if you fail to disarm it before riding home you will become aware immediately of this transgression. I’ve never felt safer locking my bike outside the gym, coworking space, or restaurants, particularly when I know I’ll be away from it for multiple hours.
A Headlamp That’s Specifically Designed for Bike Commuting
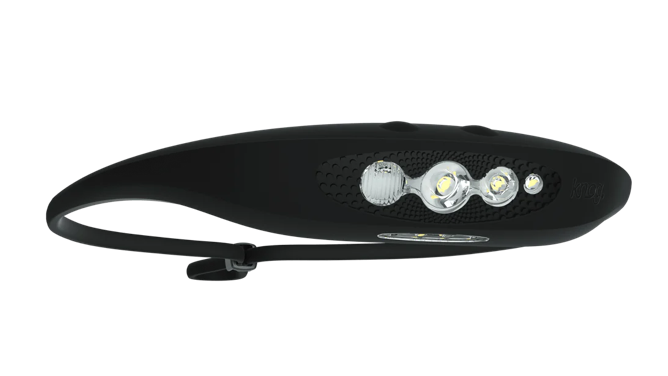
I’ve never been a fan of the headlight on bicycles. Not because I disagree with the concept. Quite the contrary: They never seem to be good enough that I feel comfortable riding in darkness on a road with cars frequently coming by in the other direction. At the risk of sounding like a prick, I want drivers to be painfully aware of my existence, and Knog’s Bilby 400 headlamp is the best device I’ve found to make sure this happens.
The Bilby 400 charges via USB rather than having to swap out a 9-volt battery like most headlamps, so you never have to go to the store to buy batteries.
Specs:
-
Beam:
Up to 330 feet
-
Water resistance:
3 feet
-
Light modes:
8, ranging from 7 to 400 lumens
-
Battery:
5 hours at max power, 105 hours at lowest power
Once turned on, the Knog Bilby 400 headlamp is the most versatile cycling headlamp I’ve ever used. I’s high beam reaches more than 300 feet on the brightest setting, with dual elliptical beams for adaptable area coverage to your left and right, and a red light for preserving night vision. The brand also included a down-facing light in case you need to check directions or find something you’ve dropped on the ground. Each beam mode has four distinct brightness settings, helpful if you’re riding in a group or on a very busy street (and in varied levels of darkness).
Like the Scout, the Bilby 400 is tech-powered, with Knog’s intuitive Modemaker app allowing you to expand the headlamp’s functionality by increasing the number of lighting modes from six to eight. If you’re truly OCD, you can even rearrange the order in which these levels of brightness occur, though I haven’t tested that process myself. I tend to use the second-brightest setting most of the time, which feels comfortable in dusk and later, given that I live in a small town and often commute on rural roads.
To charge, remove the light from the headlamp strap and plug into a USB. It takes about four hours to charge and runs for five hours on high power, or as much as 105 hours on the lowest Mid LED setting. On my head, it fits comfortably with a silicone strap that works like a strap-back cap. The entire process of charging and using this headlamp is easy-easy, to the point where I now keep it in my daypack at all times because you never know when a last minute happy hour invite might come in, causing me to arrive home later than expected.